You may have experienced the “Can’t connect to this network” error prompt while attempting to connect your computer to the internet. This message is usually displayed on Windows 10 or 11 when attempting to connect to a wi-fi network.
This can even occur if you have already tried entering the password you know is correct multiple times and some of the other devices are already connected, but yours cant. Then why does it show “Can’t connect to this network?”
Even if you are using the correct password, there could be a number of reasons why your device won’t connect to the wi-fi. Apart from a minor error, such as the router being powered off, there can be some technical errors as well, preventing you from connecting to the internet.
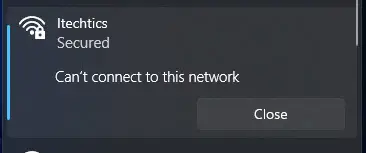
In this post, we are going to discuss multiple methods that fix any underlying issues preventing your device to connect to a network and throwing an error “Can’t connect to this Wi-Fi network.”
Table of contents
Before You Begin
Before we dive into the technicalities of fixing the issues, you must first ensure that this is not caused by some minor error. Therefore, make sure the following are valid before proceeding forward:
- The router/modem is plugged in and functional.
- You are using the correct wi-fi password.
- Your device is in range of the wi-fi signals.
- A physical switch on your computer is not disabling your wireless network card.
- Your wireless network card is physically and accurately connected, as it should.
Once you have ensured these points and are still unable to connect to the wi-fi, you can then proceed to perform the methods given below in chronological order to rectify the issue at its core and then successfully connect to the internet.
Fix “Can’t Connect To This Wi-Fi Network”
Forget and Reconnect to Network
Just to make things sure, you must first attempt to forget the network entirely and then try reconnecting to it by providing a fresh and correct wi-fi password. The steps below will guide you through the process.
-
Start by forgetting the network SSID you are attempting to connect to. To do so, expand the Quick Access menu from the taskbar and then expand the wi-fi settings. Right-click on the network that is giving you trouble, and then click Forget.
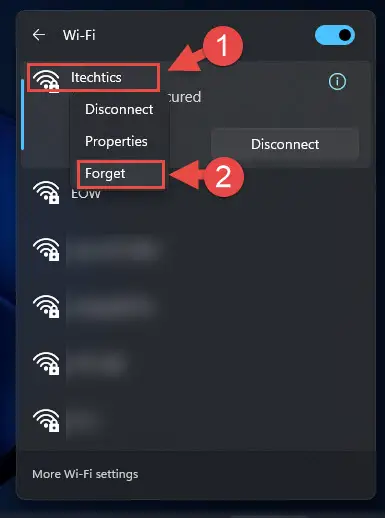
Forget network Alternatively, you can also forget a network by navigating to the following:
Settings app >> Network & internet >> Wi-Fi >> Manage known networks
-
When forgotten, attempt to reconnect to it again while typing in the password very carefully, ensuring it is the correct one.
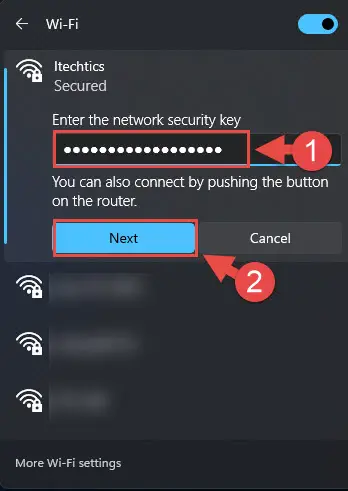
Reconnect to network
Most people usually already try out this step before reverting to solutions online, and it does not work for them. If you are in this sticky situation yourself, you can continue to attempt the methods to resolve the issue given below.
Toggle Airplane Mode
The Airplane Mode on a Windows computer is a quick way of disabling all wireless communication going in and coming out of your computer. It is named this way because any wireless interference and radiations emitted from electronic devices during an actual flight can hinder the airplane’s control systems and gauge readings.
Turning on the Airplane Mode on your computer and then disabling it will restart all of the wireless peripherals, including the wireless network card. Here is how to toggle it.
-
Open the Quick Access menu from the taskbar. Here, you will see the button labeled “Airplane Mode.” Click on it to enable it.
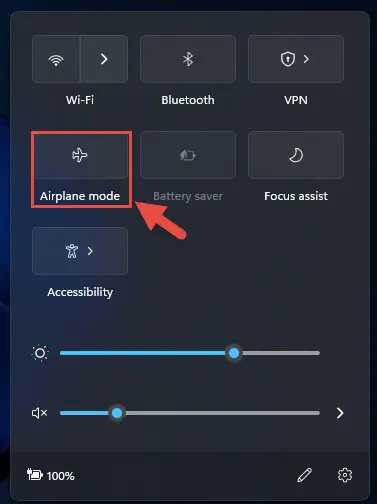
Enable Airplane Mode -
When enabled, give it a few seconds. After that, toggle it again to disable it.
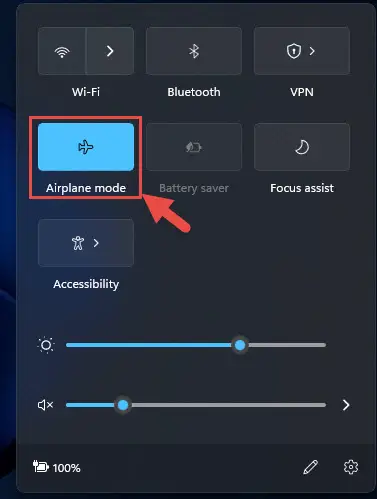
Disable Airplane Mode
Now reattempt to connect to the wi-fi network you were having trouble with.
Restart Network Adapter
If the last solution did not work for you, you can try rebooting the network adapter itself. It is a bit cliche but usually works for many of the users experiencing trouble with the network connections.
Here is how to restart your network adapter:
-
Open the Network Connection applet by typing in ncpa.cpl in the Run Command box.
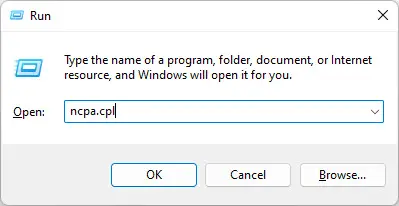
Open Network Connection applet -
Right-click on the “Wi-Fi” adapter and then click Disable from the context menu.
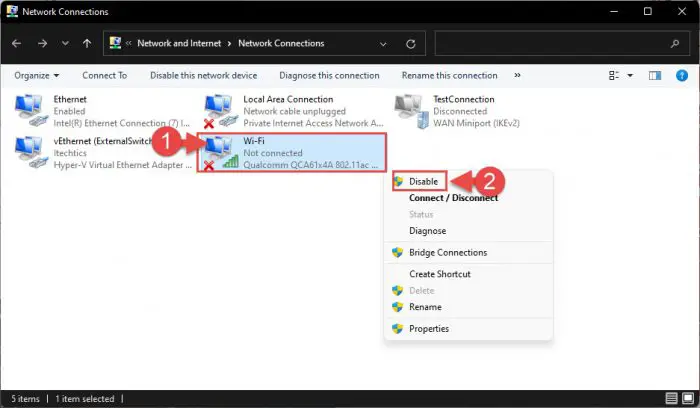
Disable network adapter -
When disabled, enable it again by right-clicking it and then clicking Enable.
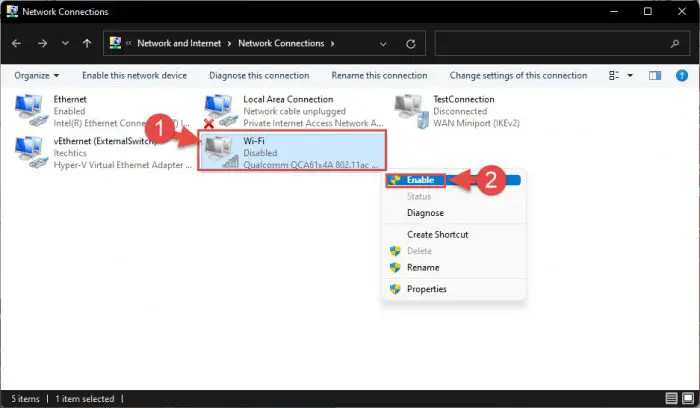
Enable network adapter
Now check to see if you are able to successfully connect to the network.
Restart Computer/ Router
If the solutions up until now have not worked for you, you can try restarting your computer and the router your device is attempting to connect to. This will ensure that any minor malfunctions on your computer will be resolved and that your router will be performing optimally.
Occasionally, a router’s device quota gets full, which means that no more devices can connect to it. If this is the reason you are experiencing the “Can’t connect to this network” error, then restarting it would automatically disconnect all devices. However, you must then attempt to reconnect to the wi-fi as soon as it boots up (before the other devices connect).
However, if this doesn’t work either, then we still have a few options remaining to rectify the issue.
Run Network Troubleshooters
Thankfully, Microsoft’s latest operating systems come with built-in troubleshooters that are programmed to detect and rectify any issues that may exist. These include troubleshooters for your network adapters as well. Run these troubleshooters to automatically detect any issues so Windows can solve them for you.
-
Navigate to the following:
-
In Windows 11:
Settings app >> System >> Troubleshoot > Other troubleshooters
-
In Windows 10:
Settings app >> Update & Security >> Troubleshoot >> Additional Troubleshooters
-
-
Here, run the Network Adapter troubleshooter.
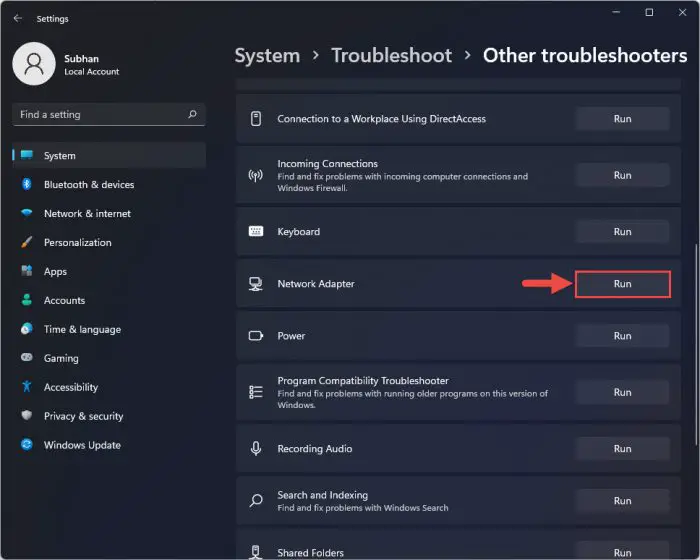
Run troubleshooter -
A wizard will now launch and scan your network adapter(s). When asked to select which adapter to troubleshoot, click on “Wi-Fi” and then click Next.
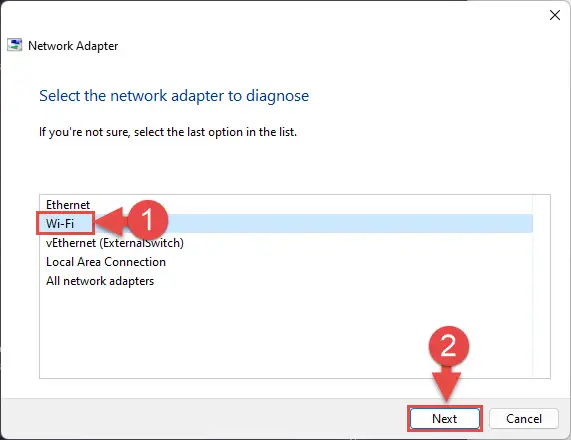
Select wi-fi -
If an issue is detected, you will be asked for a confirmation to apply its fix. Proceed by applying the fix and continue through the directions given by the troubleshooting wizard.
-
When all solutions have been applied, close the wizard.
Now check to see if you are able to connect to the network. If not, continue down this post and perform a little more aggressive solutions to get your device connected to a network.
Reset Network
On a Windows computer, you can reset the complete network configuration with a click of a button. It is a quick method to reset all configurations to their default settings. Here are the steps to reset your network:
Note: Resetting your network will bring it back to its default configuration and all manual configurations will be lost. Moreover, your computer will be rebooted automatically. Therefore, it is suggested that you save all open data and ensure that you can re-apply the configurations (if any).
-
Navigate to the following:
Settings app >> Network & internet >> Advaned network settings >> Network reset
-
Here, click Reset now, and then reconfirm your action.
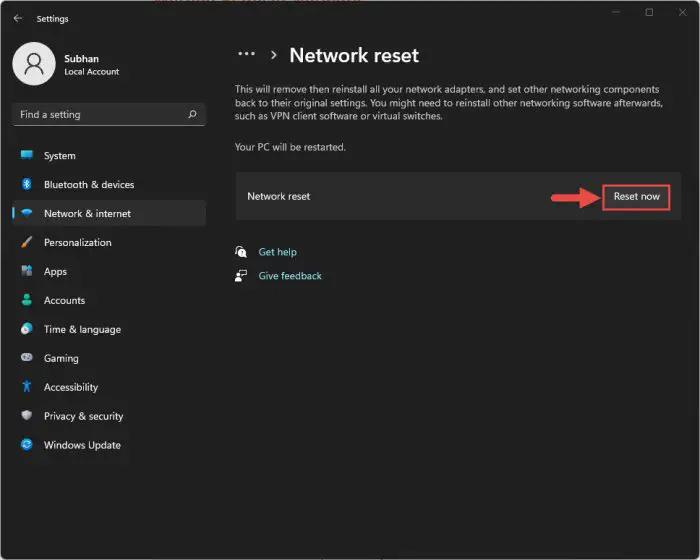
Reset network
Your network settings will now reset and your computer will reboot after approximately 5 minutes. Your computer needs this time as it is automatically reinstalling the network adapter and all necessary drivers.
When it does reboot, check to see if you are now able to connect to the wi-fi network to which you were previously unable to connect.
Reset TCP/IP Stack
The internet works on TCP/IP protocol. If TCP/IP protocol stack is not working correctly, you will have issues with your Internet connection, such as the one we are trying to fix. The best way to fix Internet issues is to reset TCP/IP stack settings. Follow these steps to learn how:
Note: Resetting your TCP/IP stack will undo any manual configurations. Therefore, it is recommended that you only proceed forward if you remember and can configure those settings again.
-
Now run the following cmdlets one after the other.
ipconfig /release ipconfig /flushdns netsh winsock reset netsh int ip reset ipconfig /renew -
When all these cmdlets are executed, restart your computer, re-apply the manual configurations (if any), and then attempt to connect to the network again.
Disable IPv6
Although the technology is making an advancement all around us, many of the network devices still support (and often use) the IPv4 networking protocol, as opposed to the IPv6 protocol. However, both of these are enabled by default on our wireless network adapters on a Windows computer.
That said, IPv6 is often not required, hence it can be disabled. Although it does not make sense to have our issue resolved by disabling this option, users have reported that it often does. Therefore, if you are still unable to connect to your network, try disabling it using these steps:
-
Open the Network Connections applet by typing in ncpa.cpl in the Run Command box.

Open the Network Connections applet -
Right-click on the “Wi-Fi” adapter and then click Properties from the context menu.
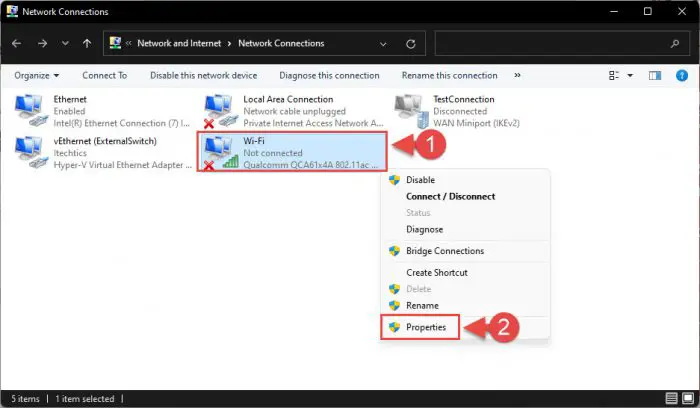
Open wi-fi properties -
From the Properties window, scroll down and uncheck the box next to “Internet Protocol Version 6 (TCP/IPv6),” then click Ok.
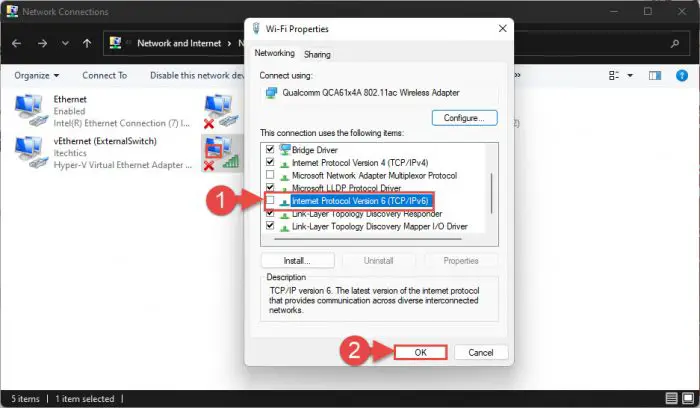
Disable IPv6
Now you must attempt to reconnect to the wi-fi network that was giving you trouble.
Update/ Reinstall Network Driver
Outdated or corrupted network drivers are often the cause of a faulty and unstable internet connection. It may be possible that you have either an old or a corrupted network driver installed which needs to be replaced in order to rectify the issue.
First, try to update your network driver to a newer, better version. However, if the latest version is already installed, then you must reinstall it. Here is how:
-
Open the Device Manager by typing in devmgmt.msc in the Run Command box.

Open Device Manager -
Expand “Network adapters” by clicking on it, then right-click on the wireless adapter and then click Update driver from the context menu.
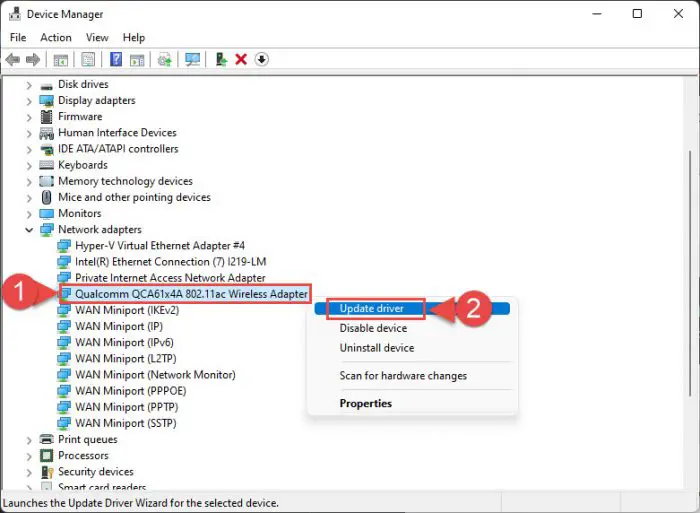
Update network driver -
You can now click “Search automatically for drivers” to automatically install the latest driver (needs internet connection), or you can click “Browse my computer for drivers” to manually update it if you have already downloaded a standalone driver for your network adapter.
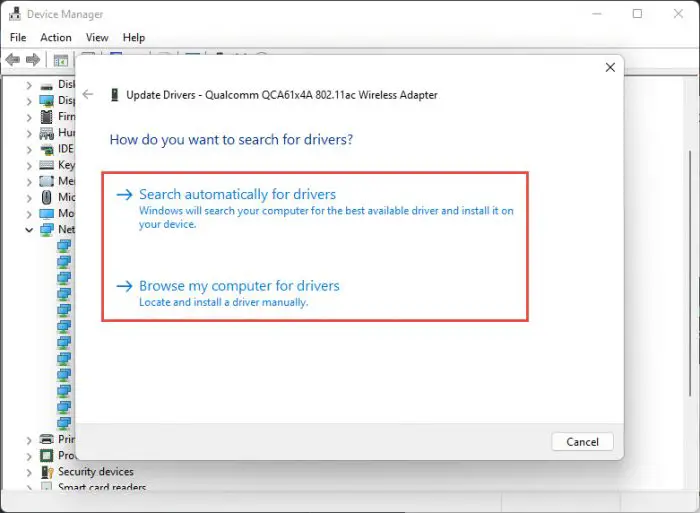
Choose how to update the network driver
Once the driver is updated, continue to check if it resolved the problem. However, if the latest driver was already installed and your problem remains, try reinstalling the driver.
Closing Thoughts
As we mentioned earlier, you can experience the “Can’t connect to this network” error due to many different reasons that are hard to pinpoint. This is why we advise our readers to test out all possible solutions because you never know which one might just work (in certain cases).
If you are still unable to resolve the issue even after performing all of the above-mentioned solutions, leave a comment below and we’ll figure it out together.
Frequently Asked Questions (FAQs)
Why is my computer unable to connect to a network?
A computer can fail to connect to a network due to multiple reasons. It may be possible that the router is disabled or full, or that you are entering the wrong password for it. Other reasons include a faulty/outdated network driver, malfunctioning network files and cache, etc.
How to fix “Can’t connect to this network?”
This error message is usually seen when connecting to wi-fi. Here are a few things you can do to fix this problem:
-Forget and reconnect to wi-fi.
-Restart the computer or network adapter.
-Reinstall/update network driver.
-Toggle the Airplane Mode.
-Reset the TCP/IP stack.

