Color calibration means adjusting different aspects of the display which includes brightness, saturation, and colors of the display so that they can match a standard or be as close as possible to the actual thing.
So by definition calibrating can be attributed to the accuracy of the subject. This may lead you to believe that you must calibrate the display immediately, well that’s not exactly true depending on how you use your computer unless you don’t work with photography in which case you are advised to use colorimeter like Datacolor’s SpyderX.
You are less likely required to be accurate about the colors as plane colors may seem lackluster which is why OEMs tune the colors that look more vivid and beautiful rather than accurate. So for the average consumer who does not work with photography, tune your display to your liking.
Table of contents
Calibrating monitor display in Windows 10
To calibrate the Windows 10 display, you need a reference so that you can tune it accordingly. You can use the one that is already in Windows. Just follow the steps below to calibrate monitor in Windows 10 using the calibration wizard.
- Go to Run –> dccw.exe. This will open the Windows 10 color calibration tool. Click Next to start.

- On clicking on the next button on the window shown, your previous color settings will reset automatically. However, on an external display, you should do it manually by using the in-built settings for the display, be it a projector or monitor.
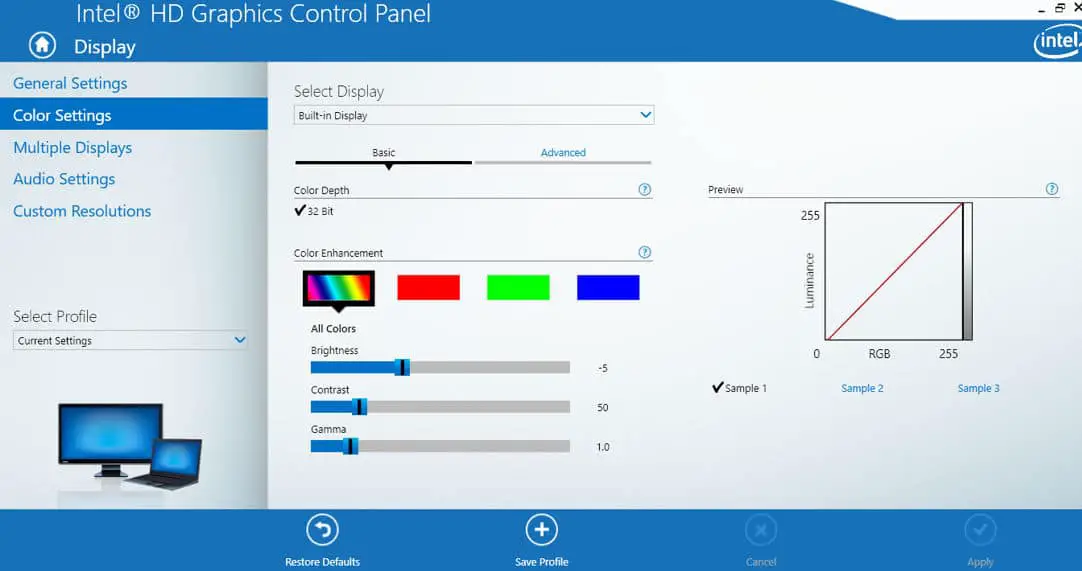
- You can also use the software in your computer to achieve this but it is recommended to use the dedicated settings of your projector or display to tune them and only use the software settings if hardware settings are not available. The software setting for the Intel HD shown here comes in the majority of laptops.

Below are the layouts for the new and old AMD driver:


- Click next again and you will see the gamma correction test. For accurate gamma correction, you should make sure that there is no dot in the image. It should just have a uniform grey sphere fading out.

- As, you can clearly see in the image provided below, dots appearing in the fading sphere.

- Now next is the brightness test which is also very important.

- Here the ‘X’ in the background must be barely visible as shown in the image without losing any details in the foreground subject.

This is the contrast correction it should be kept to the highest point just lower than the point where you would start losing the details of the shirt creases. - Lastly, you want to configure the colors which is the hardest and important part of calibrating your display you should aim for the most neutral grey be cautious there’s a good chance that you can miss the perfect grey so also take opinion from your colleagues or friends

The sliders are here to achieve the best configuration by tuning not only from given settings but also from the monitor. After hitting next you will have the option to finish it or use the Windows clear text utility if you have started feeling the text being blurred out otherwise you can uncheck it and your new settings will be saved.
Screen Calibration using online tools
While the windows utility works adequately however if it’s not your cup of tea you can also use some online tools to calibrate your display however they are not very straight forward as the one within the windows.
Photo Friday
It has mainly three scales.
- Greyscale
- True Blackscale
- True Whitescale
These scales will ensure that you aren’t missing any shade of the gradient. The key is to adjust the colors as so that each of the shade is visible and is not overtaken by the other.

Lagom LCD test
Next one is a more powerful and complex tool mainly because of the more options it has. Lagom LCD test pages are not mainly just for calibrating the monitor but they can also let you test how they perform considering the specifications they have. It has all sorts of tools from as basic as calibrating the brightness and contrast to checking the response time of the monitor. You can go through the series of images to see if your monitor is calibrated properly or even download the images from the website but in order to use them appropriately. You should be in the full-screen mode and at the full resolution of your display. Although it has more tools, you will soon find yourself be able to find flaws from your calibration because it was primarily made for checking the accuracy not for calibration yet it’s a tool worthy of a mention.

Photoscientia’s Gamma Assessment
The next test is mainly for the gamma correction of your display. It is a fairly descriptive test it explains quite a lot about the gamma assessment that can enable any new user to understand and adjust their Gammas accurately. It is one of the best if you can’t understand gamma like many new users.

Software Tools To Calibrate monitor Windows 10
Calibrize
Calibrize is the one of the best Color calibration software it not only helps the user to adjust and calibrate the display but it can also download the standard color profile for your display. Its best features are:
- Works for CRT monitors, (flat) LCD monitors and even beamers
- Reads out the color data (EDID) from your monitor
- Produces an ICC monitor profile
- Installs the profile into the appropriate system folder
- Loads a set of adjusted values into the lookup table (LUT) of your video card
- Gives background information about the process
- Cooperates seamlessly with other graphical software

QuickGamma
Last is the QuickGamma test its main focus is to allow users to adjust their Gamma values to 2.2 which is the standard for the digital world.
- Aims to provide Gamma correction without any expensive hardware.
- Lightweight
- Works with windows LUT loader.
- Comprehensive Help.

You can test out your calibration by having an image printed and then viewing it on your monitor and make further tunes for the best possible outcome. There is also color temperature which should not be too cold nor too bright. If you are really serious about the color correction then the convenience and the accuracy of a dedicated for is unmatched.
I hope these have been useful guiding steps for you and you can now understand the configuration of calibrating your display better. Was this helpful for you? Please share your thoughts in the comments below!